
Adding or changing a scheduled task
Two ways to reach this screen:
1) From the Vehicle Profile panel
2) From the Scheduled Maintenance panel
To add a new scheduled task, select a vehicle from either of the two panels mentioned above and click on the 'Add a Scheduled Task' button.
To change a scheduled task, select a vehicle from either of the two panels mentioned above and click on the Change button.
The following entry form screen appears.
Pop-up help tips and status bar messages provide context-sensitive messages as you TAB through the fields on this form.
Fields you can enter:
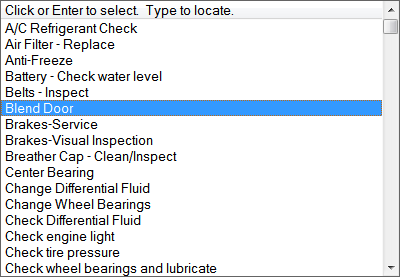
Description: (Required) Click the down arrow to see a list of descriptions (similar to the image below) or start typing a description and the closest match will appear. Once you click on one of the items from the drop-down list, any defaults for that item are also transferred from the Descriptions and Defaults table into the entry form fields. (If you did not select the item via a mouse click, then the updated fields will display when you click or tab out of the field.)
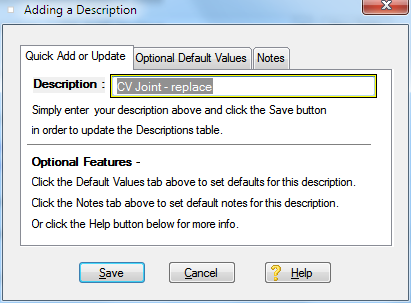
You can add a new description just by typing it. When you TAB out of the field, you will then be prompted to add the new description. (The program stores descriptions in the Descriptions and Defaults Table.)
Time Between Service: Enter how many days, weeks, months or years between service for this item. Click the down arrow to see the list of time choices as in the example below: For days, weeks, months or year items, the due date is automatically calculated upon saving the form. Example: If you rotate the tires every 6 months, put in 6 months.

Use the 'Date' option if you have scheduled a shop visit or shop order and want FleetVIP to remind you of it. (Click for more on automatic reminders.)
Once you click the Complete Highlighted Task button from the Vehicle Profile or Scheduled Maintenance windows and add the work completed record for the 'Date' item, it is removed from the Schedule Maintenance list and the history is stored.
![]() Specify 'Date' and use the calendar button and the calendar pops-up. Use it to pick the due date.
Specify 'Date' and use the calendar button and the calendar pops-up. Use it to pick the due date.

The arrows on the calendar display their use if you hold the mouse over an arrow for a second. The inner arrows move by weeks, the middle arrows by months and the outer arrows by years. Once you see the date you want displayed, click on it.
You can also type in a date instead of using the calendar. You can use shorthand date notation like 1.1.1 for Jan 1, 2001 or 10.12.5 for Oct 12, 2005. You can enter almost any date format (like Oct 10 5 for 10/10/2005 or 10 Oct 5) and it will be accepted.
Or specify 'As-Needed' and nothing else is needed since As-Needed items have no due date or recurring time intervals.
Maximum Distance: Enter the distance. (The distance unit of miles/km/hours was already specified when you added the vehicle profile and is automatically displayed here.) Example: If you rotate the tires every 6,000 miles put in 6,000.
If you enter both Time Between Service and Maximum Distance: Example - You rotate the tires every 6 months or 6,000 miles, whichever comes first. Based on your recent driving history, FleetVIP calculates the next due date based on which situation comes first, the distance limit or the time limit. All scheduled task due dates are updated using the most recent completion date and distance in the database when you enter completed maintenance tasks .
If you are interested in keeping the distance calcs absolutely 100% current, you could enter a completed maintenance task periodically and call it something like Mileage Update and post the current mileage whenever you want. Since FleetVIP uses the most recent item entered to calculate due dates, that is an easy way to enter current mileage even if you did not do any maintenance on that date. You could do this if you just returned from a long vacation road trip and ran up a lot more miles than usual in 2 weeks. You could even make it a scheduled task if you want automatic reminders. But it is totally optional if you do this.
Preferred Provider: (Optional) Click the down arrow to pick from the list of service providers or type a new provider name and when you TAB out of the field, you will be prompted to add a new provider to the Service Providers Table. If you specify a preferred provider, the provider will automatically be carried over to history whenever you enter a completed task for this scheduled item.
Warranty Requirement: ![]() Click the box if this task is required for warranty compliance. You can also print a report of these Warranty Requirement items to show you have met the warranty requirements.
Click the box if this task is required for warranty compliance. You can also print a report of these Warranty Requirement items to show you have met the warranty requirements.
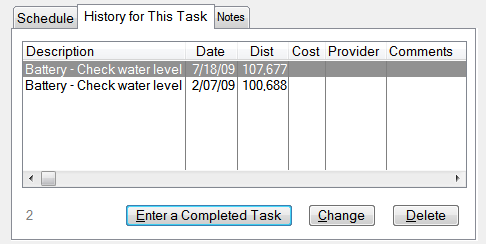
History Tab: This tab lists all the previous times this same task has been done. You can also add completed history dates for this item from the history tab by clicking the 'Enter a Completed Task' button.
Notes Tab: Jot down anything you want to mention about this scheduled task. You can even enter multi-page checklists or extensive multi-page notes into the Notes tab. If any notes were previously saved for this task, the word Notes will be underlined.
Print Button: The print button prints the currently displayed scheduled task including any notes from the Notes tab. This feature is very useful if you have extensive notes to share or if you use the Notes tab to store a detailed checklist associated with the task.
Click the Save button on the Schedule tab when done.
![]()